记一次 Fresco 和 AutoSize 导致的 Bitmap 问题

前言
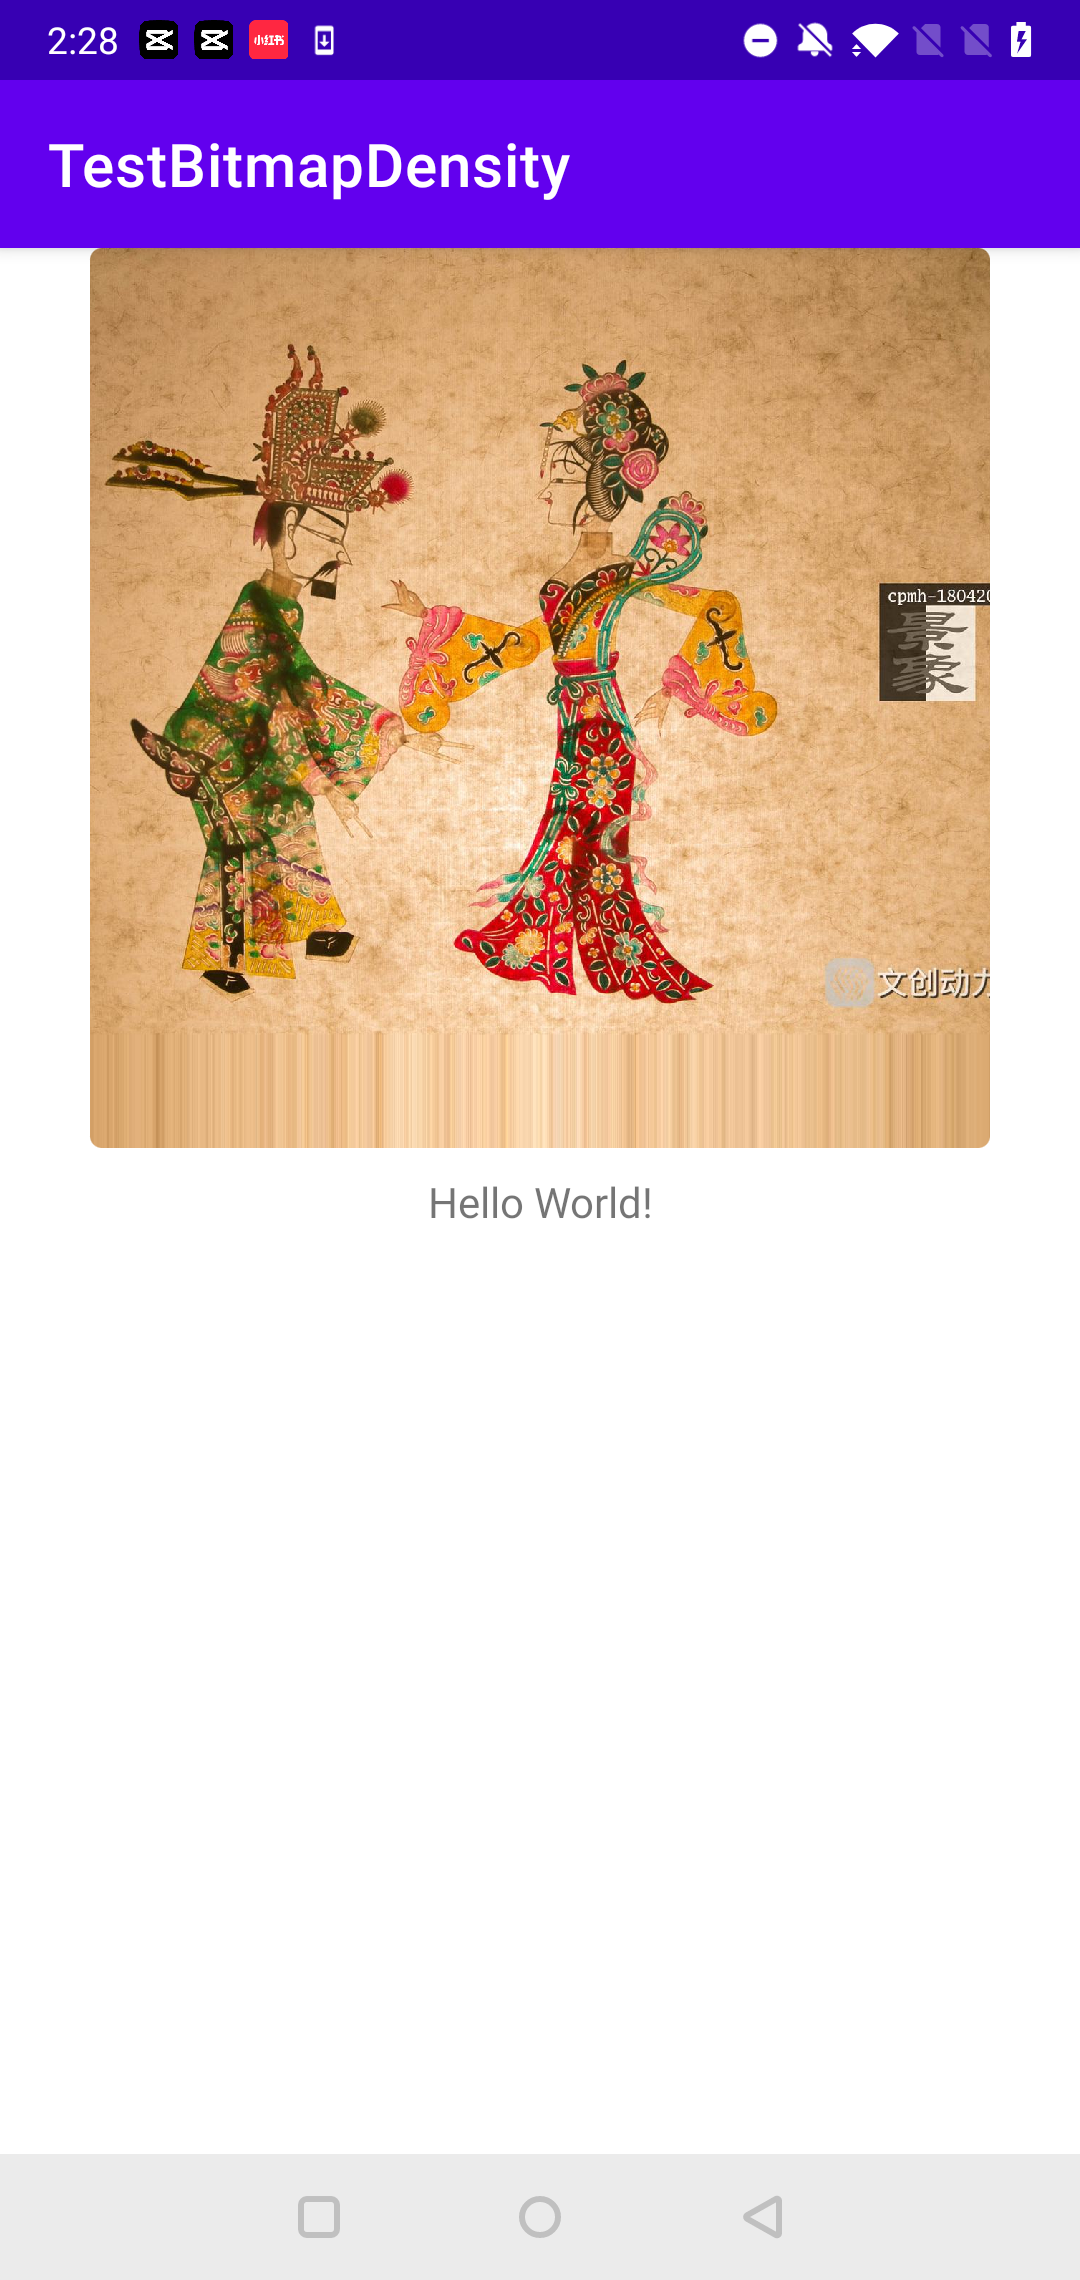
不知道大家使用 Fresco 时,有没有遇到过这种情况呢?

一些文章上是说,导致的原因是在设置了 圆角 的情况下,设置错了 ScaleType 导致图片不能铺满整个 View,进而出现了图中的情况。
文档如下: 圆角的两种模式(看最后的说明部分)
那如果你是 ScaleType 设置错误了的话,通过设置 ScaleType = “CenterCrop” 之类的能铺满 View 的方法就应该可以拯救你了。(后面的就是废话了,不用看啦!)
如果你也设置了 ScaleType,仍然有这种问题的话,不妨看看工程里是不是引入了 AndroidAutoSize 这个库。
我当时查问题,也是受益于这个 issue,发现这个问题的大哥你真棒!
那么为什么 AndroidAutoSize 会影响到图片加载呢?
总结一句话就是: AndroidAutoSize 影响到了 density
density 为啥会影响 Bitmap 呢?
这就得从各种最基本的知识出发了!
先看看 Fresco 圆角怎么实现的吧!
Fresco 圆角
Fresco 的圆角,普通图片非 ColorDrawable 的情况下,都是依靠 RoundedBitmapDrawable 来实现。
再底层其实都是依靠 BitmapShader + Path 了,来看看 RoundedBitmapDrawable.updatePaint() 的代码:
private void updatePaint() {
  if (mLastBitmap == null || mLastBitmap.get() != mBitmap) {
    mLastBitmap = new WeakReference<>(mBitmap);
    mPaint.setShader(new BitmapShader(mBitmap, Shader.TileMode.CLAMP, Shader.TileMode.CLAMP));
    mIsShaderTransformDirty = true;
  }
  if (mIsShaderTransformDirty) {
    mPaint.getShader().setLocalMatrix(mTransform);
    mIsShaderTransformDirty = false;
  }
  mPaint.setFilterBitmap(getPaintFilterBitmap());
}
可以看到使用了 BitmapShader,TileMode CLAMP。
CLAMP
Replicate the edge color if the shader draws outside of its original bounds.
如果着色器绘制在边界之外,则复制边缘颜色。
所以说,如果 Bitmap 的大小不够铺满整个 View,那就会出现之前图中的情况了。
可是设置了 CenterCrop 属性,那大小应该可以覆盖整个 View 才对,那为啥结果是没有呢?
图片是如何展示的
一个图片转为 Bitmap 到底怎么呈现到 ImageView 上的呢?
这破问题,之前面试腾讯的时候每次都问,还有各种一系列问题,如:
同一个手机,同一张图片在 xxhdpi 和 xhdpi,加载到内存里一样吗?
计算下分别多大啊?
如果 ImageView 宽高不同呢?
RGB_565 和 RGB_8888 啥区别啊?
我个人感觉这种问题其实大家都知道,大家心里都存在这么个概念,心里有数,碰到问题解决问题即可,非要当面试题算,纯属耍流氓···
既然今天遇到了,那就看看呗,相当于顺便复习了
Bitmap
Bitmap 就是一张图片的数据源,当我们从网络上下载一张图片时,图片从流中解码成 Bitmap。
Bitmap bitmap = BitmapFactory.decodeStream(inputStream)
如果图片原始大小是 100x100 像素,但是我的 View 宽高是 50x50 像素,显然我不需要 100x100 这么大的图片。
这就有了常说的 BitmapFactory.Options,通过 inJustDecodeBounds 获取宽高,再用 inSampleSize 缩小对应比例。
古老的 Android 书里似乎还会教这个,不过现在都是图片加载框架帮你搞定了。
Bitmap 高本版早已分配在 native 内存中,可以去追追代码。
Mutable 和 Reconfigure
可能你一直没有在意过,Bitmap 有个 mutable 属性。在 Bitmap.createBitmap 方法中,mutable 默认是 true。其实,这个属性可以用于复用 Bitmap 底层申请的内存。
怎么复用呢?
这就是 Bitmap 的 reconfigure 方法了,这也是个基本没人知道的方法。通过它,可以修改 Bitmap Config,包括 width,height 和 像素格式。所以,Fresco 中有个 BucketsBitmapPool,它的 alloc 方法,默认申请的大小是 width = 1,像素格式为 RGB_565 格式的 Bitmap,但是并不影响后续使用,reconfigure 一下就可以了。
density
Bitmap 还有个属性叫做 density,这个应该也鲜为人知。
density 的作用,我目前只看到了 BitmapDrawable 中有使用。图片展示都是依赖于BitmapDrawable 的 draw 方法。
public void draw(Canvas canvas) {
  // 省略
  updateDstRectAndInsetsIfDirty();
  // 省略
  canvas.drawBitmap(bitmap, null, mDstRect, paint);
  // 省略
}
那代码中的 mDstRect 哪里来的呢?
其实是 updateDstRectAndInsetsIfDirty() 方法会更新 mDstRect
 Gravity.apply(mBitmapState.mGravity, mBitmapWidth, mBitmapHeight,
                        bounds, mDstRect, layoutDirection);
而每当我们 setBitmap 时,最终都会触发一个 BitmapDrawable.computeBitmapSize() 的方法,更新 mBitmap 的宽高属性
private void computeBitmapSize() {
  final Bitmap bitmap = mBitmapState.mBitmap;
  if (bitmap != null) {
      mBitmapWidth = bitmap.getScaledWidth(mTargetDensity);
      mBitmapHeight = bitmap.getScaledHeight(mTargetDensity);
  } else {
      mBitmapWidth = mBitmapHeight = -1;
  }
}
所以说,Bitmap 的 density 会影响到 canvas 最终绘制的 mDstRect,进而影响到图片的展示。
默认情况下,Bitmap 就是系统的 density,系统的 density 不会有啥变化,所以不会有任何影响。
Drawable
前面已经说了一堆 BitmapDrawable 了,Drawable 就是 Android 抽象出来的一种处理绘制过程的抽象类。在 Fresco 中,这个被用烂了。
Fresco 中其实全靠 GenericDraweeHierarchy,GenericDraweeHierarchy 中有各种层级的 Drawable,注释如下:
Example hierarchy with a placeholder, retry, failure and the actual image:
    o RootDrawable (top level drawable)
    |
    +--o FadeDrawable
       |
       +--o ScaleTypeDrawable (placeholder branch, optional)
       |  |
       |  +--o Drawable (placeholder image)
       |
       +--o ScaleTypeDrawable (actual image branch)
       |  |
       |  +--o ForwardingDrawable (actual image wrapper)
       |     |
       |     +--o Drawable (actual image)
       |
       +--o null (progress bar branch, optional)
       |
       +--o Drawable (retry image branch, optional)
       |
       +--o ScaleTypeDrawable (failure image branch, optional)
          |
          +--o Drawable (failure image)
比如其中的 FadeDrawable 就是渐现的具体实现,ScaleTypeDrawable 就是 ScaleType 的具体实现,每一个 SimpleDraweeView 的展示,都有多层的 Drawable。
我们常见的 ScaleType 的实现都是通过给 Drawable 设置各种 transform 矩阵(canvas.concat(matrix))来做的,无论是 ImageView 还是 Fresco(SimpleDraweeView)。
Fresco 中使用 actualImageScaleType,其实最终都在 ScalingUtils 中,比如 CenterCrop 对应为 ScaleTypeCenterCrop 静态内部类,返回一个对应的 outTransform 矩阵。
总之,最终还是调用到 scaleTypeDrawable 的 draw 方法,concat 一个矩阵
public void draw(Canvas canvas) {
  configureBoundsIfUnderlyingChanged();
  if (mDrawMatrix != null) {
    int saveCount = canvas.save();
    canvas.clipRect(getBounds());
    canvas.concat(mDrawMatrix);
    super.draw(canvas);
    canvas.restoreToCount(saveCount);
  } else {
    // mDrawMatrix == null means our bounds match and we can take fast path
    super.draw(canvas);
  }
}
小结
Bitmap 本身的 density 变化,会影响到 BitmapDrawable 的 DstRect 进而影响到绘制的范围。
普通 ImageView 的 ScaleType 和 Fresco 的 actualImageScaleType 会影响到 canvas.concat(matrix) 进而影响到绘制的范围。
解析原因
BitmapShader 会使得边缘像素重复
Fresco 中的 RoundedBitmapDrawable 通过 BitmapShader 实现,TileMode.CLAMP 在铺不满 view 的情况下,会重复边缘像素。
BitmapDrawble 的 Density 被 AutoSize 修改
RoundedBitmapDrawable 创建的代码如下:
public RoundedBitmapDrawable(Resources res, @Nullable Bitmap bitmap, @Nullable Paint paint) {
    super(new BitmapDrawable(res, bitmap));
    mBitmap = bitmap;
    if (paint != null) {
      mPaint.set(paint);
    }

    mPaint.setFlags(Paint.ANTI_ALIAS_FLAG);
    mBorderPaint.setStyle(Paint.Style.STROKE);
  }
RoundedBitmapDrawable 内部创建了 BitmapDrawable,并通过 resource 获取到 density
而 AutoSize 这个库,默认会修改 density
比如,我的一加 A6000 density 本来是 420,依赖 AutoSize 后变为了 480。
所以,此时 BitmapDrawble 的 density(mTargetDensity) = 480,进而 computeBitmapSize 其实已经出现问题。
BucketsBitmapPool 创建 Bitmap 没有管 Density
然后,有意思的来了,Bitmap 初始化默认的 density 是多少呢?
Fresco 中通过 BucketsBitmapPool 调用 Bitmap.createBitmap 实现的,一路追下去就到了 native 方法中,nativeCreateBimap 其实 register 的时候叫做 Bitmap_creator ,追相关的方法,你就会发现调用到了这里:
jobject createBitmap(JNIEnv* env, Bitmap* bitmap,
        int bitmapCreateFlags, jbyteArray ninePatchChunk, jobject ninePatchInsets,
        int density) {
    bool isMutable = bitmapCreateFlags & kBitmapCreateFlag_Mutable;
    bool isPremultiplied = bitmapCreateFlags & kBitmapCreateFlag_Premultiplied;
    // The caller needs to have already set the alpha type properly, so the
    // native SkBitmap stays in sync with the Java Bitmap.
    assert_premultiplied(bitmap->info(), isPremultiplied);
    bool fromMalloc = bitmap->pixelStorageType() == PixelStorageType::Heap;
    BitmapWrapper* bitmapWrapper = new BitmapWrapper(bitmap);
    if (!isMutable) {
        bitmapWrapper->bitmap().setImmutable();
    }
    jobject obj = env->NewObject(gBitmap_class, gBitmap_constructorMethodID,
            reinterpret_cast<jlong>(bitmapWrapper), bitmap->width(), bitmap->height(), density,
            isPremultiplied, ninePatchChunk, ninePatchInsets, fromMalloc);

    if (env->ExceptionCheck() != 0) {
        ALOGE("*** Uncaught exception returned from Java call!\n");
        env->ExceptionDescribe();
    }
    return obj;
}
此处 density 传的值是 -1,因为调用的时候没有传值,Bitmap.h 方法声明中有默认值 -1。
但是,我的 Bitmap 中的 density 显示 = 420,很神奇。
这是为什么呢?
其实都在 env->NewObject 中,native 层反调了 java 层的 Bitmap 构造函数,>=0 时才生效,-1 时会走进 Bitmap.getDefaultDensity() 的逻辑
static int getDefaultDensity() {
    if (sDefaultDensity >= 0) {
        return sDefaultDensity;
    }
    sDefaultDensity = DisplayMetrics.DENSITY_DEVICE;
    return sDefaultDensity;
}

// DisplayMetrics.java
private static int getDeviceDensity() {
    // qemu.sf.lcd_density can be used to override ro.sf.lcd_density
    // when running in the emulator, allowing for dynamic configurations.
    // The reason for this is that ro.sf.lcd_density is write-once and is
    // set by the init process when it parses build.prop before anything else.
    return SystemProperties.getInt("qemu.sf.lcd_density",
            SystemProperties.getInt("ro.sf.lcd_density", DENSITY_DEFAULT));
}
根本不是从 Resource 中获取,直接读取的 SystemProperties,所以两个 density 不一样。
最终就成了这样,比如 Bitmap 有 100x100 的大小,却要覆盖 120x120 的区间,BitmapShader 帮忙盖满,从而出现了一开始的图中的情况。
所以修改的方案是:
- 能干掉 AutoSize 的话,直接干掉 AutoSize
- 不能干掉 AutoSize 的话
- 如前面说的 issue 中一样,复写一个 wrappingutils,给 bitmap 赋值 AutoSize 后的 density
- 重写 AutoSize 的 strategy,这个库很坑,默认全局开启 AutoSize,重写了以后就可以默认全局不开启,但是这样启用了 AutoSize 的页面仍然还是有问题。