DataBinding 解读

前言
Android 的应用层架构,其实一直在缓慢的进步,但是 Android 开发工程师却很少有进步。比如我,直到 2021 年才开始使用 dataBinding。
我初步在 RecyclerView 的 item 中试用了一下,感觉还是挺不错的。
环境准备
AGP(Android Gradle Plugin)
官方说是 1.5.0 以上就好了,肯定都没什么问题。
说到这里,AGP 都帮我们做了什么?Android 的编译过程其实有很多东西,只不过我目前对于这一方面的了解也很有限。
gradle
android {
        ...
        dataBinding {
            enabled = true
        }
}
通过上述配置,即可打开 dataBinding,AGP 4.0 的话也可以使用 buildFeatures。
通过 AGP 的支持,编译过程中 帮我们做了很多事情。
大致的使用方式
通过在 layout 文件中绑定表达式的方式来实现数据绑定。
写过后端或者前端的人应该对此再熟悉不过了。
一个 layout 文件的示例
<!--notification_no_picture.xml-->
<layout xmlns:android="http://schemas.android.com/apk/res/android">

  <data>
    <variable
      name="notification"
      type="com.ptrain.note.model.Notification" />
  </data>

  <TextView
    android:id="@+id/description"
    android:layout_width="match_parent"
    android:layout_height="wrap_content"
    android:layout_marginTop="8dp"
    android:text="@{notification.description}"
    android:textColor="@color/teal_700"
    android:textSize="16sp" />

</layout>
传入 notification 实例, 使用 @{notification.xxx} 取值,也可以使用 @={notification.xxx} 实现双向绑定。
那么怎么绑定实例呢?
XXXBinding binding =  DataBindingUtil.inflate(context, layoutId, parent, attachToParent);
// 上述实例中就是
// NotificationOnePictureBinding binding = DataBindingUtil.inflate(context, layoutId, parent, attachToParent);
binding.setXXXX(model);
binding.executePendingBindings();
// 上述实例中就是
// binding.setNotification(notification);
数据类一定要使用可观察对象或者直接使用可观察字段
几个重要的类
为什么短短几行代码就帮我们实现了数据绑定呢(上面例子是单向数据绑定)?
主要是编译期间,AGP 帮助生成了一些代码,例子中的 NotificationOnePictureBinding.java 和其 setNotification() 方法,都是在编译过程中自己生成的。
-
XXXBinding.java
编译时生成,XXXBindingImpl extends XXXBinding,此类是 xml 对应的类,会根据 xml 名字生成对应的类名,比如notification_no_picture.xml会生成对应的NotificationNoPictureBinding.java。类内持有带有 id 的 view 对象和绑定的数据类。 -
XXXBindingImpl.java
编译时生成,XXXBindingImpl extends XXXBinding,命名逻辑同 XXXBinding.java,大部分的数据绑定的回调逻辑都在这个 java 类中。 -
ViewDataBing.java
此类不是编译生成的,而是databing-runtime库中的一个类。ViewDataBing extends BaseObservable,XXXBingding extends ViewDataBinding。这个类很重要。 -
BaseObservable.java
此类不是编译生成的,同 ViewDataBinding。顾名思义,用于绑定 listener,触发数据刷新 notifyXXX()。 -
BR.java
编译时生成。为什么叫这个名字我也不是很清楚,可能是缩写?这个类是一张 key 的列表,包含用于数据绑定的资源的 ID。
使用可观察对象和字段
使用 databinding 时,对于数据类有着 特殊要求。
要使用可观察的对象、集合、字段,这些无一例外均继承自 BaseObservable,他们如何联动后续会有说明。
什么是可观察的数据类型?
google文档 https://developer.android.com/topic/libraries/data-binding/observability
当然,也可以直接使用 LiveData,更省事。
后续文章都是建立在 使用 Java 和 不使用 LiveData 的基础之上。
DataBinding 源码分析
错误的 model 类
假设数据类如下,继承 BaseObservable。
public class Notification extends BaseObservable {
  public String description;
  public String title;
}
layout 文件如下:
<?xml version="1.0" encoding="utf-8"?>
<layout xmlns:android="http://schemas.android.com/apk/res/android"
  xmlns:app="http://schemas.android.com/apk/res-auto">
  <data>
    <variable
      name="notification"
      type="com.ptrain.note.model.Notification" />
  </data>

  <androidx.constraintlayout.widget.ConstraintLayout
    android:layout_width="match_parent"
    android:layout_height="wrap_content"
    android:paddingLeft="8dp"
    android:paddingRight="8dp">

    <TextView
      android:id="@+id/title"
      android:layout_width="match_parent"
      android:layout_height="wrap_content"
      android:text="@{notification.title}"
      android:textColor="@color/black"
      android:textSize="24sp"
      app:layout_constraintBottom_toTopOf="@+id/description"
      app:layout_constraintTop_toTopOf="parent" />

    <TextView
      android:id="@+id/description"
      android:layout_width="match_parent"
      android:layout_height="wrap_content"
      android:text="@{notification.description}"
      android:textColor="@color/teal_700"
      android:textSize="16sp"
      android:layout_marginTop="8dp"
      app:layout_constraintBottom_toBottomOf="parent"
      app:layout_constraintTop_toBottomOf="@+id/title" />
  </androidx.constraintlayout.widget.ConstraintLayout>
</layout>
修改数据类和 bind 的代码如下:
// bind 相关的代码,在 onCreateViewHolder 和 onBindViewHolder 中
@Override
public NotificationOnePictureViewHolder onCreateViewHolder(ViewGroup parent) {
    NotificationOnePictureBinding binding = DataBindingUtil
    .inflate(LayoutInflater.from(parent.getContext()), NotificationType.ONE_PICTURE, parent,
        false);
    return new NotificationOnePictureViewHolder(binding);
}

// onBindViewHolder 我用的 Adapter 重构了一下,不用在意
@Override
protected void onBind(Notification data) {
    // 把数据类传递给 binding
    binding.setNotification(data);
    binding.executePendingBindings();
}

// ----------------------------------------------------------
// 数据初始化和修改相关的代码
// 省略初始化 notificationList 数据
List<Notification> notificationList = new ArrayList<>();
// 传递给 adapter
adapter.setData(notificationList);
// 随意模拟一下 5s 后修改源数据,不要在意 Handler
Handler handler = new Handler();
handler.postDelayed(new Runnable() {
    @Override
    public void run() {
    notificationList.get(0).setTitle("i have changed");
    }
}, 5000);
这样能实现数据绑定吗?否
问题在于数据类,虽然继承了 BaseObservable,但是并没有调用 notify(),那么修改一下,如下呢?
public class Notification extends BaseObservable {
  public String description;
  public String title;

  public String getTitle() {
    return title;
  }

  public String getDescription() {
    return description;
  }

  public void updateTitle(String title) {
    this.title = title;
    // 此处改变
    notifyPropertyChanged(BR.notification);
  }

  public void updateDescription(String description) {
    this.description = description;
    // 此处改变
    notifyPropertyChanged(BR.notification);
  }

}
这样能实现数据绑定吗?否
两个问题
BR.java 的 key 如何生成?
notifyPropertyChanged() 有什么作用
BR.java 的 key 如何生成?
在上述代码中,BR.java 只有两个属性 notification 和 _all。
all 顾名思义就是全部的意思
notification 是我们在 layout 文件中定义的
所以结论是,BR 由 layout 文件 data 节点的 name 生成 key?显然不是
前面给的 google 文档中,提到了 @Bindable 注解,我们此处并没有使用,一但给 getter 方法加上 @Bindable 注解,我们就会发现 BR 里的 key 会相应的增加。
所以结论是,BR.java 中的 key 由 @Bindable 和 layout 文件共同决定
趁热打铁增加 @Bindable 注解
代码修改如下:
public class Notification extends BaseObservable {
  public String description;
  public String title;

  // 此处改变
  @Bindable
  public String getTitle() {
    return title;
  }
  // 此处改变
  @Bindable
  public String getDescription() {
    return description;
  }

  public void updateTitle(String title) {
    this.title = title;
    notifyPropertyChanged(BR.notification);
  }

  public void updateDescription(String description) {
    this.description = description;
    notifyPropertyChanged(BR.notification);
  }

}
这样能实现数据绑定吗?否
这就不得不研究一下 notifyPropertyChanged 方法
notifyPropertyChanged() 引出的整个链路
因为 Notification extends BaseObservable,BaseObservable 中 notifyPropertyChanged 代码如下
public void notifyPropertyChanged(int fieldId) {
    synchronized (this) {
        if (mCallbacks == null) {
            return;
        }
    }
    mCallbacks.notifyCallbacks(this, fieldId, null);
}
所以是通过 mCallbacks 回调,那么 mCallbacks 何时来的?
调用栈如下:
addOnPropertyChangedCallback:33, BaseObservable (androidx.databinding)
addListener:1446, ViewDataBinding$WeakPropertyListener (androidx.databinding)
addListener:1431, ViewDataBinding$WeakPropertyListener (androidx.databinding)
setTarget:1404, ViewDataBinding$WeakListener (androidx.databinding)
registerTo:688, ViewDataBinding (androidx.databinding)
updateRegistration:612, ViewDataBinding (androidx.databinding)
updateRegistration:627, ViewDataBinding (androidx.databinding)
setNotification:74, NotificationOnePictureBindingImpl (com.ptrain.note.databinding)
onBind:42, NotificationOnePictureBinder$NotificationOnePictureViewHolder (com.ptrain.note.viewholder)
还记得 onBindViewHolder 通过 binding.setNotification 传递 model 实例么?此时通过 setNotification 一系列调用,便注册了 mCallbacks
updateRegistration() 方法便是对应了 之前 说的 可观察数据类型
protected boolean updateRegistration(int localFieldId, Observable observable) {
    return updateRegistration(localFieldId, observable, CREATE_PROPERTY_LISTENER);
}

protected boolean updateRegistration(int localFieldId, ObservableList observable) {
    return updateRegistration(localFieldId, observable, CREATE_LIST_LISTENER);
}

protected boolean updateRegistration(int localFieldId, ObservableMap observable) {
    return updateRegistration(localFieldId, observable, CREATE_MAP_LISTENER);
}

protected boolean updateLiveDataRegistration(int localFieldId, LiveData<?> observable) {
    mInLiveDataRegisterObserver = true;
    try {
        return updateRegistration(localFieldId, observable, CREATE_LIVE_DATA_LISTENER);
    } finally {
        mInLiveDataRegisterObserver = false;
    }
}
我们这里传递的是 Observable(BaseObservable implements Observable),所以是 CREATE_PROPERTY_LISTENER,属性监听器。
@Override
public void addListener(Observable target) {
    target.addOnPropertyChangedCallback(this);
}

@Override
public void addOnPropertyChangedCallback(@NonNull OnPropertyChangedCallback callback) {
    synchronized (this) {
        if (mCallbacks == null) {
            // 此处创建 PropertyChangeRegistry
            mCallbacks = new PropertyChangeRegistry();
        }
    }
    mCallbacks.add(callback);
}
WeakPropertyListener.addListener 把自己传了回去,然后 addOnPropertyChangedCallback 创建了 PropertyChangeRegistry extends CallbackRegistry
所以 mCallbacks 中的元素在本例中其实就是 WeakPropertyListener(如果数据类型是其他类型,则对应相应的可观察类型的Listener)
mCallbacks.notifyCallbacks 会调用到 CallbackRegistry.notifyCallbacks,这个方法没有细看,但是是个递归,通过它的注释知道,用于回调所有的 callback。
private void notifyCallbacks(T sender, int arg, A arg2, final int startIndex,
            final int endIndex, final long bits) {
    long bitMask = 1;
    for (int i = startIndex; i < endIndex; i++) {
        if ((bits & bitMask) == 0) {
            mNotifier.onNotifyCallback(mCallbacks.get(i), sender, arg, arg2);
        }
        bitMask <<= 1;
    }
}
CallbackRegistry 中的 mNotifier ,由 PropertyChangeRegistry mNotifier 回调到 WeakPropertyListener.onPropertyChanged 中,最终到 XXXBindingImpl.onChangeXXXXX 处理属性变化。
调用栈如下:
onChangeNotification:92, NotificationOnePictureBindingImpl (com.ptrain.note.databinding)
onFieldChange:87, NotificationOnePictureBindingImpl (com.ptrain.note.databinding)
handleFieldChange:549, ViewDataBinding (androidx.databinding)
access$800:65, ViewDataBinding (androidx.databinding)
onPropertyChanged:1468, ViewDataBinding$WeakPropertyListener (androidx.databinding)
onNotifyCallback:30, PropertyChangeRegistry$1 (androidx.databinding)
onNotifyCallback:26, PropertyChangeRegistry$1 (androidx.databinding)
notifyCallbacks:201, CallbackRegistry (androidx.databinding)
notifyFirst64:122, CallbackRegistry (androidx.databinding)
notifyRemainder:169, CallbackRegistry (androidx.databinding)
notifyRecurse:145, CallbackRegistry (androidx.databinding)
notifyCallbacks:91, CallbackRegistry (androidx.databinding)
notifyPropertyChanged:76, BaseObservable (androidx.databinding)
setTitle:31, Notification (com.ptrain.note.model)
所以 notifyPropertyChanged 作用很简单,处理属性修改后的回调,回调的具体代码实际就在生成的 BindingImpl 中,本例中为:
// 编译生成的 XXXBindingImpl.java 中的 onChangeYYY(YYY 是绑定的名称) 方法
private boolean onChangeNotification(com.ptrain.note.model.Notification Notification, int fieldId) {
    if (fieldId == BR._all) {
        synchronized(this) {
                mDirtyFlags |= 0x1L;
        }
        return true;
    }
    else if (fieldId == BR.title) {
        synchronized(this) {
                mDirtyFlags |= 0x2L;
        }
        return true;
    }
    else if (fieldId == BR.description) {
        synchronized(this) {
                mDirtyFlags |= 0x4L;
        }
        return true;
    }
    return false;
}
model 类错误的原因
通过上面的 onChangeNotification 代码也知道,只有当 fieldId 为 _all、title、description 三者之一时才会触发更新,所以我们的 setter 方法中的 notifyPropertyChanged 需要修改。
为什么 onChangeNotification 没有处理 BR.notification 的逻辑呢?
这个我也不清楚,因为此类为编译时生成。
不过也很 符合逻辑。因为如果要处理 BR.notification 就是 BR._all 的概念了。
onChangeNotification 之后做了什么
notifyPropertyChanged 的部分追踪到了 onChangeNotification,那么之后又发生了什么?
调用 requestRebind() 更新下一帧 UI。
代码如下:
// ViewDataBinding.java
protected void requestRebind() {
    if (mContainingBinding != null) {
        mContainingBinding.requestRebind();
    } else {
        final LifecycleOwner owner = this.mLifecycleOwner;
        if (owner != null) {
            Lifecycle.State state = owner.getLifecycle().getCurrentState();
            if (!state.isAtLeast(Lifecycle.State.STARTED)) {
                return; // wait until lifecycle owner is started
            }
        }
        synchronized (this) {
            if (mPendingRebind) {
                return;
            }
            mPendingRebind = true;
        }
        if (USE_CHOREOGRAPHER) {
            mChoreographer.postFrameCallback(mFrameCallback);
        } else {
            mUIThreadHandler.post(mRebindRunnable);
        }
    }
}
可以看到低版本使用 mUIThreadHandler,高版本注册 FrameCallback,最终都是执行 mRebindRunnable,最终执行
executePendingBindings() 再到 executeBindings()。
executeBindings() 通过 dirtyFlags 来更新对用的 View 的数据。
Android 高版本调用栈如下:
executeBindings:115, NotificationOnePictureBindingImpl (com.ptrain.note.databinding)
executeBindingsInternal:473, ViewDataBinding (androidx.databinding)
executePendingBindings:445, ViewDataBinding (androidx.databinding)
run:197, ViewDataBinding$7 (androidx.databinding)
doFrame:291, ViewDataBinding$8 (androidx.databinding)
run:1310, Choreographer$CallbackRecord (android.view)
doCallbacks:1123, Choreographer (android.view)
doFrame:934, Choreographer (android.view)
run:1298, Choreographer$FrameDisplayEventReceiver (android.view)
至此单向绑定就说完了
双向绑定
layout.xml 使用 @={}
双向绑定其实就是在对应的控件生成 listener,回调数据类的 setter 方法,如果你不写就会编译报错。
生成的代码依然在对应的 BindingImpl.java 中。
总结
几个重要的类,遇到问题就去这里找答案

流程
因为代码均是编译时生成的,根据数据类型不同或者 layout.xml 文件名不同等等而改变,这里都用 X 来代替了。
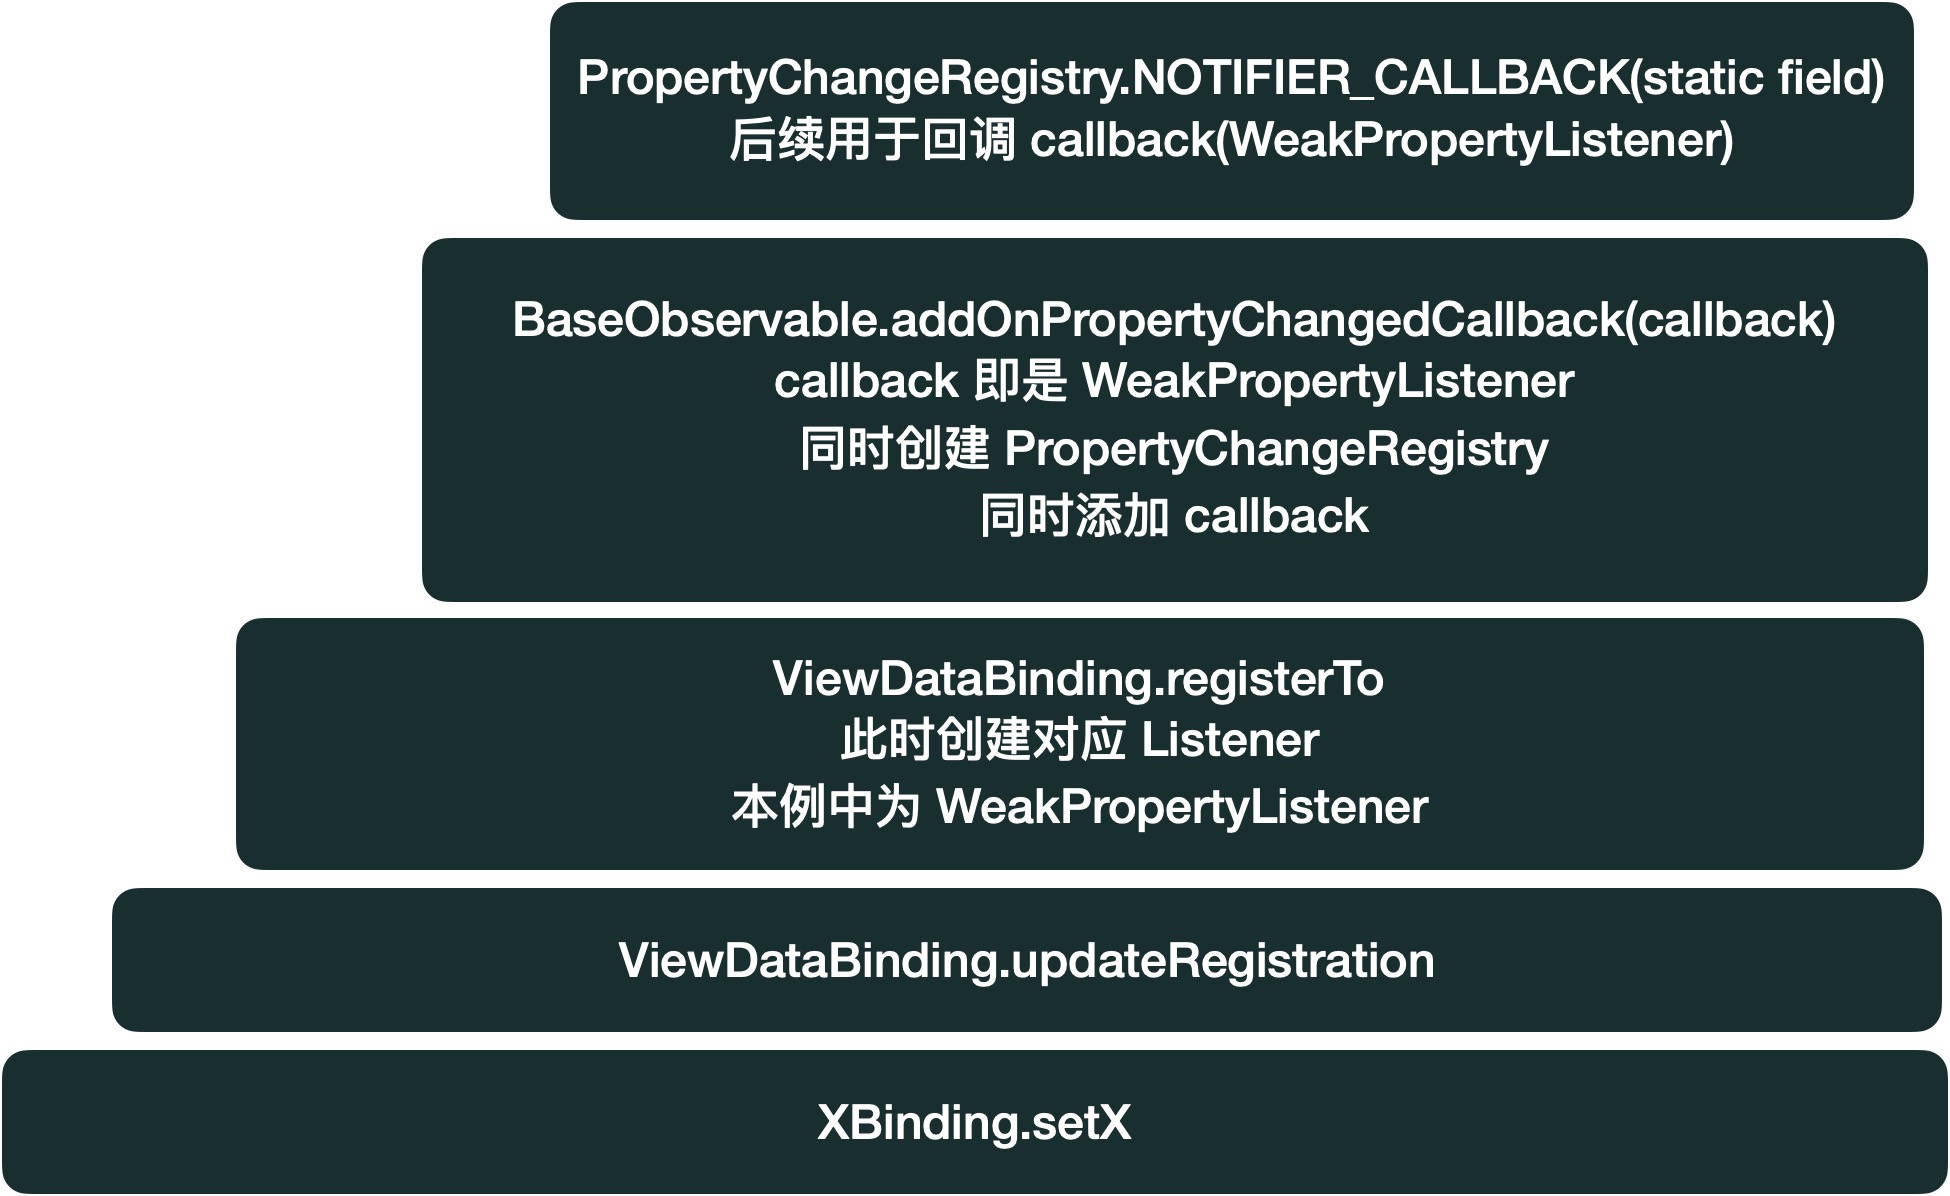
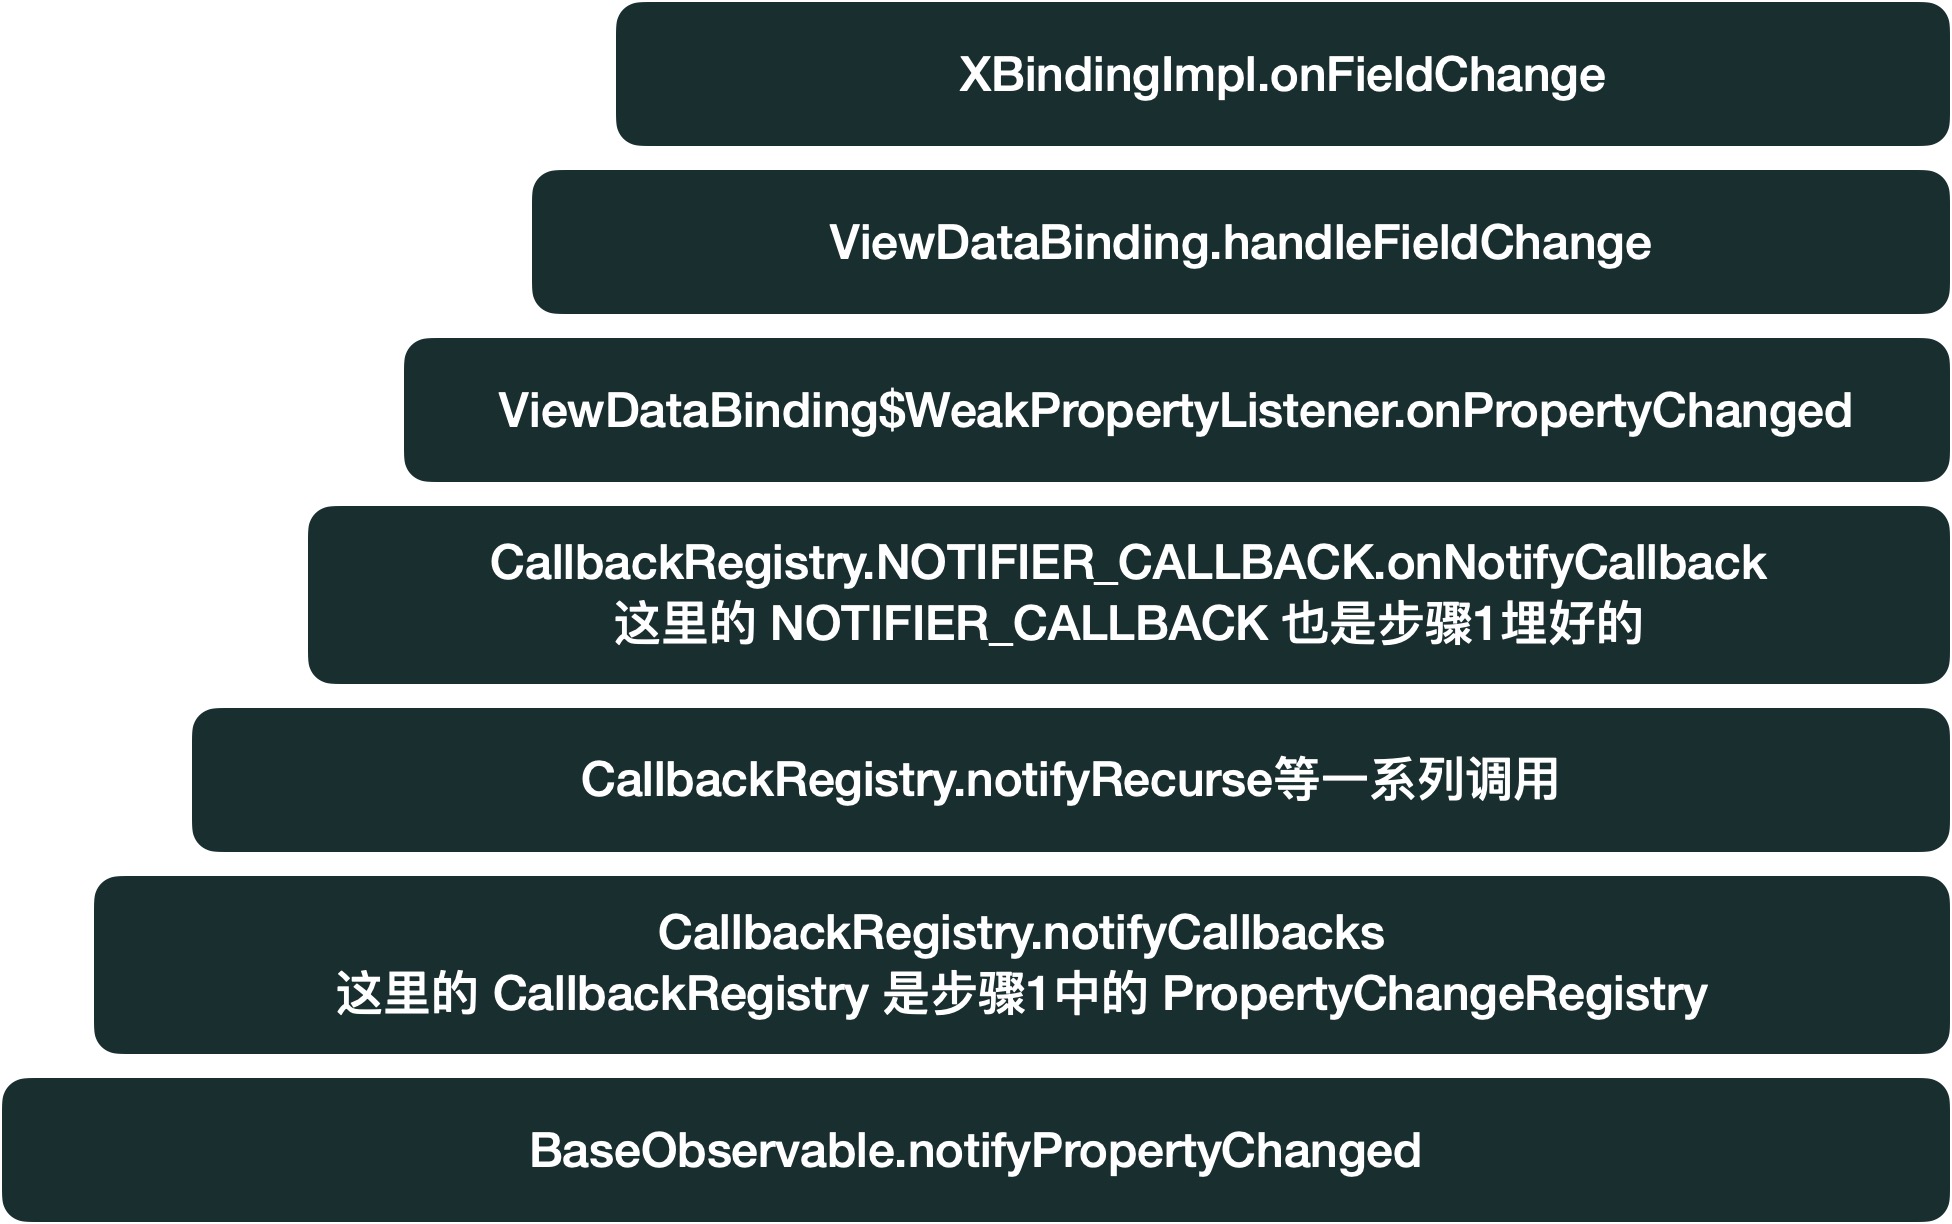
大致分为三个步骤
1. bindListener 过程

这个步骤,注册好了属性的监听,埋下了回调逻辑。
2. notify 过程

这个步骤,通过触发属性更新,打通了之前埋下的回调逻辑,一直调用到编译生成的 XBindingImpl.java 中的 onFieldChange 和 onChangeNotification。
3.refresh 过程
refresh 过程比较简单,在下一帧时调用 ViewDataBinding.mRebindRunnable,一直调用到编译生成的 XBindingImpl.java 中的 executeBindings,来更新 view。
其他(但很重要)
DataBinding 还有自定义的 Binding Adapter,这个将会让 DataBinding 更加灵活,可以让你随意处理 model 数据内容以适应 view 的要求。
google文档 https://developer.android.com/topic/libraries/data-binding/binding-adapters